ADMIN
APR 12, 2022
Browan Object Locator for Helium Mappers and Helium Cargo
The following document provides a step-by-step instructions on how to onboard the Browan Object Locator onto the Helium Network for use on Helium Mappers and Helium Cargo, helping identify and verify Helium Network coverage wherever the Object Locator is heard.
1. When you receive your Object Locator, fully charge the device. When the device is connected to a powered charger, the green LED will be continuously on indicating the battery is charging.
2. Once the battery is fully charged, the LED will fade-in and out at a rate of 12 cycles per minute.
3. You are now ready to add your device to your Helium Console. If you do not already have a Helium Console Account, you can sign up for one here. Where it asks for "Organization Name" enter something you will remember that is unique to you. Example: Your name
4. Please note that when you first sign-up for a Helium Console account, you are given 10,000 Data Credits. Each time your device communicates over the Helium network, it will use a Data Credit. Additional Data Credits can be purchased through the Helium Console.
5. Dev EUI, App EUI, and App Key information should have been included on your order packing slip. You can also reference this information by logging on to your CalChip customer account and referencing the notes of your order number. You will also receive an email with the subject line "CalChipConnect Order - Important information to use your sensors" that will instruct you on how to receive these keys.
6. Add New Device using the left navigation bar
a. Create a Device Name (Example: Browan Object Locator)
b. Enter Dev EUI
c. Enter App EUI (This may be referred to as the Join EUI)
d. Enter App Key
e. Save Device
7. Add New Function using the left navigation bar
a. Name the decoder (Example: Tabs Decoder)
b. Function type: Decoder
c. Choose Format: Custom Script
d. Copy and paste the following in the Custom Script box:
function Decoder(bytes, port) {
var decoded = {};
// Some "common status format"
decoded.status = bits(bytes[0], 4, 7);
decoded.battery = (25 + bits(bytes[1], 0, 3)) / 10,
decoded.capacity = 100 * (bits(bytes[1], 4, 7) / 15),
// Bit 7 is RFU; exclude
decoded.temperature = bits(bytes[2], 0, 7) - 32,
decoded.gnssFix = bit(bytes[0], 3),
// LSB, ignoring the 4 high bits (RFU) and sign-extending to 32 bits
// to support negative values, by shifting 4 bytes too far to the
// left (which discards those bits, as only 32 bits are preserved),
// followed by a sign-propagating right shift:
decoded.latitude = (bytes[3] | bytes[4] << 8 | bytes[5] << 16
| bytes[6] << 28 >> 4) / 1e6,
// Likewise, ignoring the 3 high bits (used for accuracy):
decoded.longitude = (bytes[7] | bytes[8] << 8 | bytes[9] << 16
| bytes[10] << 27 >> 3) / 1e6,
// Accuracy in meters; 1 << x+2 is the same as Pow(2, x+2) for x < 32
decoded.accuracy = 1 << bits(bytes[10], 5, 7) + 2,
decoded.altitude = 0;
return decoded;
}
// Gets the zero-based unsigned numeric value of the given bit(s)
function bits(value, lsb, msb) {
var len = msb - lsb + 1;
var mask = (1 << len) - 1;
return value >> lsb & mask;
}
// Gets the boolean value of the given bit
function bit(value, bit) {
return (value & (1 << bit)) > 0;
}
e. Save Function
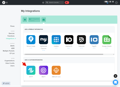
8. Add A New Integration
To create a new HTTP integration in Console, navigate to the Integrations page using the left navigation and then select the HTTP integration.
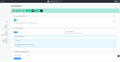
Next we will fill in the details, see instructions and image below.
1. Enter the Mappers API Ingest Endpoint URL (Required) https://mappers.helium.com/api/v1/ingest/uplink
2. Enter the name for this Integration: Mappers Integration
3. Finally, click Add Integration to complete.
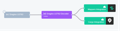
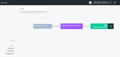
9. Next we will create a Flow. Navigate to the Flows page and click the + sign next to Nodes.

10. Drag and drop your device, function, and integration on the workspace. Link them by drawing lines with your mouse between the connection points. Link device -> decoder -> integration.
11. You are now ready to power on your Object Locater. To turn ON the device, hold down the button for at least 10 seconds. The device will turn on when the green LED lights up solid for 3 seconds. To turn OFF the device, hold down the button for at least 10 seconds until the LED flashes rapidly for 3 seconds.
12. When you first turn on the Object Locator, the device needs to receive the GPS almanac, which is a set of data that every GPS satellite transmits. This process can take anywhere from 30-secs to 12-minutes. So, we recommend either keep the unit outside under open sky or take a walk/drive with the device to allow it that time to download the almanac.
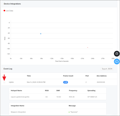
13. Verify that data is being sent correctly to the Mapper API. To do this just expand an uplink event in the event log and verify that you are getting a "Success" message for the integration as shown below.
14. During normal operation, the Object Locator will update status every 120 minutes when the device is stationary. When the device is in motion, it will update status every 30 seconds.
15. That's all! You can now expect to see your data show up on mappers.helium.com in a few minutes. If you want to see where your mapper is on the map, you could use Cargo. You will have to add one more integration and link it to the decoder in your flow.